Monday, December 16, 2013

real food swap*

Remember back in May when I posted about the real food swap that some friends and I started? Well, we are still going strong and meeting up every month to swap wonderful, real food goodness! Here are a few photos from our swap today - I think it might have been the best one yet! 
 
 
These were my offerings - dark chocolate sauce, espresso stout brewed by my hubby, mint, chocolate-mint and vanilla extracts and chai tea concentrate.


spicy canned beans, my offerings from the photo above, beeswax candles, raw beeswax, and tangerines!

spice mixes, beautiful glass decanters, cinnamon extract and caramel!

Some of our lovely swappers. This is my friend's gorgeous new kitchen in her home that they recently remodeled. I now have serious kitchen envy.

Applesauce, purees (pumpkin or squash, I believe) glass jugs/growlers, and pickles!

Yogurt starter, soap, toffee, hand knit dishcloths, homemade vapor rub, mustard and jams and jellies!

Bulk spices - turmeric, celery seed, mustard seed and more caramel sauce!

There was even more that I didn't get a pic of. Letterpress goodies (I got the cutest beer coasters to include in my mama's Christmas gift basket!), sausage and bacon, rye and sourdough bread, pizza dough and homemade Nutella!
I posted a pic of all the amazing stuff I brought home with me on my Instagram page - I am inspirederika over there if you would like to come take a peek!

Now we are starting to plan the swaps for next year - I simply cannot wait to see what the new year has in store for The Treasure Valley Real Foodies!
 

apples and vinegar :: part two

 Back to the vinegar making process! I filled you in on the first steps of homemade apple scrap vinegar in this post. Here is how it turned out!

This is what the mixture looked like the day I strained the apple scraps out. This is pre-stirring and approximately 3 weeks after I started the process.


And here it is after a good stir. Nice and bubbly and very fragrant!


I put the scraps in a cloth produce bag and tied it to the cupboard door to let all the liquid strain out.

Here is my lovely apple scrap liquid (not quite vinegar yet!)

Next I added a couple glugs (technical term) of raw apple cider vinegar to the liquid and gave it a stir then covered it with a clean tea towel and set is aside in a warm corner of the kitchen.
A couple weeks later this beautiful mother of vinegar had grown over the surface of the liquid! Now it is vinegar!

I bottled it up and added a piece of the MOV to each glass jar. The smaller jars were perfect for gifting!

Look closely and you can see the mother hanging out at the bottom of this jar.

So that's pretty much it! Delicious, homemade vinegar from fruit scraps! I have been saving more apple scraps in a zip lock bag that I keep in the fridge for my next batch. And I will add my own vinegar and mother (instead of the Bragg's raw vinegar I added to this batch) to future batches to kick start the process!

A few notes ::
I will use this vinegar for dressings, marinades, cooking, etc. but it is not safe to replace in canning recipes as the percent of acidity is unknown. I plan to try it out in place of my apple cider vinegar tonic that I drink for health reasons to see if I notice a difference. I am also going to try it on my hair to see if it is as effective in such applications as my beloved Bragg's ACV. I will keep you all posted with the results!

Friday, November 01, 2013

hello november*costume round-up

 These are the costumes we made this year. A peacock and two little wolves complete with fluffy tails! They wore them for the Ghouls at School event a few evenings ago.

Last night for trick or treating they sifted through the dress up box and became superheroes and a kitty.
 
 Luca was very grumpy and cried and cried while we got him ready. If he were an only child we would have happily stayed in for the night.

 However a proven remedy for cranky kiddos is lots of fresh air and running. Costumes and treats just sweeten the deal!


Today we indulge! Tomorrow we detox...

Saturday, October 12, 2013

apples and vinegar*part one

 
 I processed 40 pounds of apples a couple weeks ago. I put up 2 dozen pints of applesauce and 9 quarts of pie filling.

 And I was left with this large pile of apple scraps. I gave a bowl full to the chickens but there was far more than they could eat. Instead of tossing the rest into the compost heap I decided to give apple vinegar a try!

{the following method will work with any fruit scraps}
 Sandor E. Katz's formula from Wild Fermentation is 1/4 cup sugar per quart of water. You need to use enough liquid to completely cover the fruit scraps in a jar or crock. Then cover the crock with a clean tea towel secured with a rubber band and set aside in a nice, warm place.
You will give the mixture a stir once a day.
 
Day 12 - before stirring. There were little bubbles popping up from under the apples.
Day 12 - after stirring. It is bubbly and starting to smell like vinegar!

I am going to strain the apple scraps out this weekend and then it will go back to the crock to continue to ferment until it becomes vinegar. To be continued...


Wednesday, September 25, 2013

sad news from the farmette*

 Our sweet senior angora bunny left us yesterday. We suspected that she was not feeling her best so I brought her inside and held her in my arms and that is where she eventually took her last breath.
 
Then my kind-hearted husband stood in the rain digging a hole for her tiny body. She is buried right next to our garden where she loved to spend her evenings.


Rest peacefully Betty Bunny. You were loved deeply.

Tuesday, September 24, 2013

cold packed pickles*

 My family loves a good pickle. We eat them for snacks, add thick slices to sandwiches and chop them for salads. The three cucumber plants in my garden produced insane volumes this year and I pickled every cuke that was not eaten fresh. I made several pints of dill pickles from a canning book and also canned a whole lot of Garlic Dills.
The idea to cold pack a big batch of cucumbers came from a place of an over abundant garden and absolutely no time to put it all up properly.
The results of my "lazy" preserving were the best tasting and crunchiest pickles ever. Not even kidding!!
I used this tutorial (with a few changes noted below) which makes a gallon jar of cold packed pickles. I was hesitant because let's face it, a gallon sized jar is a huge refrigerator footprint! But I got over that real quick when I tasted the results. I made a second batch yesterday and just tuck the jar into the very back of the fridge until they are ready to eat. From that point on the jar lives at the front of the fridge for easy access! Once the jar was half empty I transferred the contents to a smaller jar.
First I made my brine ::
8 cups water
1 cup white vinegar
1 cup apple cider vinegar
1/2 cup pickling salt (or 3.5 oz by weight)
Bring this mixture to a boil then remove from burner and let the brine cool to room temperature.
Next up are the aromatics and spices. I added 8 garlic cloves, 4 dill heads and 5 tsp. of pickling spice to the bottom of the jar.

Click on the photo above to read the contents of the pickling spice that I used.

Then I pack the jar with freshly cut cucumber spears (some of the smaller cukes are cut in half rather than spears). Some of these were plucked from the garden and immediately packed into the pickle jar! I topped the jar with 4 more dill heads and filled the jar with the cooled brine until everything is submerged. Refrigerate them for approximately 4 weeks and you will then have the best pickles you've ever eaten! Yum!!
{the smaller jar above is quart sized and I used the same technique but decreased all of the aromatics and brine ingredients by 3/4. So I added 2 garlic cloves,  2 dill heads... you get the picture!}

Monday, September 23, 2013

happy thirteen*

Today I am celebrating 13 years of marriage with this fine fellow.
 
This has been a very difficult year for our family. We have been living with a lot of stress and uncertainty. Not my favorite. But there has also been a tremendous amount of love and support from our amazing friends and family. And from my sweet husband. I am in love. Deeply and forever.
 
Thirteen is our lucky year. Bring it!
 
Here is our 12th anniversary post.
And our 11th.
and our 10th.
An our 9th...


Sunday, September 22, 2013

autumn*apple picking*and filling a canning pantry

Happy day, friends. Today is the Autumnal Equinox! Yesterday we met some friends at a local orchard to pick apples. Sadly due to a devastating frost we experienced in late May the apples in our area are scarce. The orchard we visited yesterday said they lost 90% of their crop. But the weather was lovely and the company was fantastic and it was overall a whole lot of fun!


 {I remembered to charge my camera battery the evening before but I forgot to put the battery back into the camera. Boo. Thank goodness for smart phone cameras, I suppose}

We collectively picked two 22 pound bushels of apples and split them up. I brought home approximately 10 pounds of golden delicious apples from the orchard and stopped at a little fruit and veggie stand on the way home and bought 24 pounds of organic gala apples. Applesauce, pie filling and apple butter production begins tomorrow! I also bought 3.5 pounds of peppers from the kind folks at the orchard. And I harvested 1/2 pound from my own garden the morning before. I am planning a big batch of candied jalapenos for the pantry and will make fresh jalapeno poppers with the leftovers.

 
Speaking of the pantry it is slowly but sure filling up. This is the most recent photo taken last month. I have added a few more items since then. We have preserved our entire garden this year - canning, freezing and drying everything in sight! I have been roasting tomatoes and garlic one pan at a time and freezing them so I can make one huge batch of sauce. Over the next few days I will post recipes for the things I have made this year  - for my reference and yours! My family has a new favorite jam and I cannot wait to share it with you!
 
Happy harvest, loves! I hope you are enjoying this magical time of year as much as I am! xo


Thursday, August 01, 2013

betty the angora*welcome to the farmette


meet betty, our new angora bunny! 

 
she is a senior rabbit at 5 years old and was rehomed because her family is moving and was unable to take her along. at one time she was a kindergarten classroom pet so she is quite used to lots of attention. we plan to add more fiber rabbits to the farmette next year but for now we are happy and content to have this little sweetheart around.


betty bunny's little hutch, right outside our patio door.

the farmette is growing again! yesssss!


Saturday, July 27, 2013

*beeswax cloth tutorial

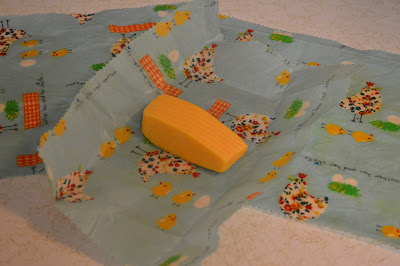
I made a bunch of beeswax cloth a few weeks ago bringing us one step closer to a plastic free kitchen! It is simple to make and even easier to use. We wrap food (like cheese and sandwiches) and cover bowls and jars with them. And they smell so sweet and good!
 
You will need ::
Beeswax - if you do not have pellets like I did you can use an old cheese grater. But the wax is really hard to get off so you need one that will only be used for this project. I got my beeswax from Mountain Rose Herbs.
 
Fabric - I recommend only natural fibers for this project. Cotton or linen is ideal. I used lightweight cotton for my wraps. Cut the fabric into any shape or size you want. I used pinking shears to keep the edges from fraying. Make sure it is clean and lint free.
 
 
Cookie sheet - lining your cookie sheet with foil will make clean up a breeze!


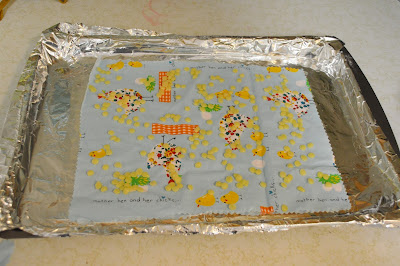
Heat your oven to 170 degrees. Put your fabric on the lined cookie sheet and sprinkle the beeswax on like the photo above. You do not need to cover the entire surface as it will spread as it melts. Put it in the oven for 6 or 7 minutes. remove as soon as all the beeswax is melted.


Once it is out of the oven you will need to work fast! The wax will start to harden as soon as it is out. Hang the cloth up and let it cool. If there are spots with no wax put it back on the cookie sheet and put a small piece of wax on the bare parts and pop it back into oven. If you ended up with too much wax put it on top of a fresh piece of fabric and put it in the oven for a few minutes.


Use the heat of your hands to mold the beeswax cloth to whatever you are wrapping. It will also stick to itself or to the rim of a bowl or jar to create a seal. You can wipe it clean or wash it with cool, soapy water then air dry. Just do not use hot water, of course.
 
So there you go! Bye-bye plastic wrap!


Saturday, June 29, 2013

*it's hot, folks.

Things I loathe when the temps are in the triple digits ::
* driving * dog breath * bras * making food * eating food *
 
Things I love, even when it is ridiculously hot outside ::
*happy, healthy veggie plants * cool showers * smoothies for dinner *popsicles *


* watching my boys water the garden with buckets *
* cold brewed coffee, lots of ice, sweetened with local honey
and topped off with a splash of raw milk *
* watching the kiddos from this spot in my dining room,
right next to an A/C vent for good measure *