Showing posts with label knitting patterns. Show all posts

Sunday, May 23, 2010

altered knits :: wool romper

i cast on this wool romper for baby several months ago while there was still snow on the ground. the yarn is cascade eco wool-it was originally gray and purchased for another project. one afternoon, on a whim, i decided to over dye the gray wool and whip up something wonderful for the little one growing in my womb. and this was the wonderful result. i think the first photo most accurately captures the colors i ended up with.

as for the pattern, it was completely improvised starting with a free sweater pattern. now there are two little romper patterns available for purchase from sweet mama-small sugar. her patterns were not yet published when i knit this romper, but if they had been i likely would have gone that route and saved myself quite a bit of figuring and guessing.

for those of you that would like to knit your own improvised romper i am sharing with you how i made this one. enjoy!
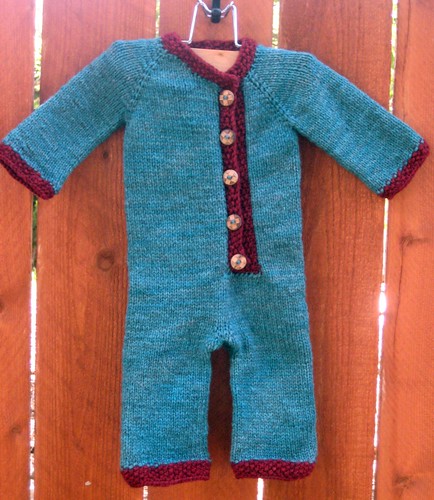
i started with the mossy jacket sweater pattern. since my baby was expected in the spring and i wanted him to wear it the following winter i cast on the 12 month size. i simply knit the pattern as written but did not cast off at the bottom of the sweater, but rather continued to knit the "pant" part of the romper. once i completed the button band i added stitch markers to each hip- i added the first hip marker where it looked like it ought to go, then knit half the stitches on my needles and added the second hip marker. i did not add short rows to the bum area, but you easily could for extra room, especially if the romper will be worn by a cloth diapered baby.

measure your baby from armpit to right below the hip. knit in stockinette until you have reached this measurement, then you can begin your crotch gusset. you are going to add two more stitch markers by dividing the stitches between your hip markers by 2 and adding the markers accordingly. so if there are 50 stitches between your hip markers you will knit to the first marker, knit 25, place new marker, knit 50, place second new marker, then knit 25, back to the first stitch marker. it helps if the new markers used for the front and back look different than the two hip markers.

gusset ::
you can use any preferred technique for your gusset. i made mine like this.
row 1 : knit to 1 stitch before front marker and m1r, slip marker, k1, and m1l. pass the hip marker and repeat increases when you get to the back stitch marker.
row 2 : knit all stitches.

repeat these two rows until you have your desired amount of gusset stitches. i ended up with 10 gusset stitches.
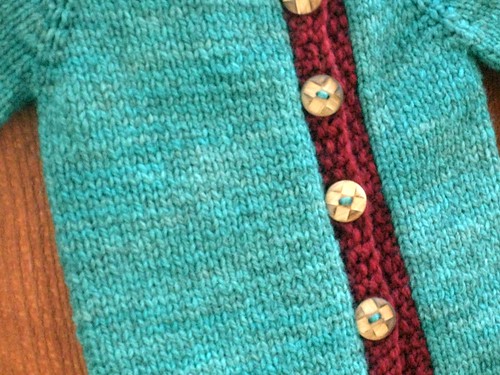
now you will knit the legs of your romper. knit one more row, placing the front and back gusset stitches on scrap yarn to deal with later. you can now choose to magic loop both legs at once or knit them singularly on dpn's. knit the legs to desired inseam, add a decorative cuff, and cast off. you will now need to go back and add the sleeves and button and neck bands as directed in the sweater pattern, then kitchener stitch the crotch gusset. lastly, choose the perfect buttons and sew them on.

and there you have it, a super sweet wool romper, perfect for winter bundling! i will be sure to post photos of our own little bundled baby when he grows and the snow falls. this would also be adorable with short sleeves and short legs in a lighter weight yarn for spring wear!

happy knitting, friends!

Pin It


Monday, December 28, 2009

faux cable sleep sack :: a pattern

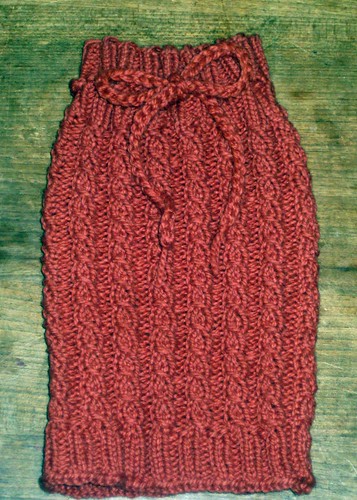
wool sleep sacks are wonderful for new cloth diapered babies and make night time diaper changes a breeze! this faux cable pattern creates a lovely thick and stretchy fabric, perfect for diaper covers. i have been knitting sleep sacks in preparation for our new baby and thought i would share this pattern that i have developed. enjoy!


you will need ::
16 inch circular needles in sizes US 5 and US 8
1 stitch marker
crochet hook (optional for drawstring)
100% wool yarn- i like to use nice, sturdy yarn. wool that will work well for this pattern are cestari merino (terra cotta sleep sack in photo), araucania nature wool (lavender sleep sack in photo), cascade eco, or something similar. if you are using a thinner weight yarn you may need to use a smaller needle size. approx. 200 yards is needed.

abbreviations ::
co = cast on
k = knit
p= purl
sl1= slip 1 stitch knitwise
psso = pass the slipped stitch over the last 2 sts that you knit
yo = yarn over


the pattern ::

co 80 stitches using size 5 needles, place marker and join in the round being careful to not twist your stitches. knit 2 x 2 ribbing for 1.5 inches.
eyelet row- *k2tog, yo, p2* repeat from * to end of row.
continue to knit 2 x 2 ribbing for another 1.5 inches.

switch to size 8 needles and knit the faux cable pattern as follows ::
row 1: *k3, p2*repeat from * to end of row.
row 2: *k3, p2* repeat from * to end of row.
row 3: *sl1, k2, psso, p2* repeat from * to end of row.
row 4: *k1, yo, k1, p2* repeat from * to end of row.
continue knitting these 4 rows until your piece measures 11 inches from the co.

switch back to your size 5 needles and knit 2 x 2 ribbing for 2 inches. cast off loosely- you might want to cast off with your larger needles to ensure the bottom of the sleep sack is stretchy enough to pull up for diaper changes.

drawstring :: you can use any preferred method to make your drawstring. i like to make a crochet chain holding 2 strands of yarn together. using 2 different colors makes a fun drawstring!

now you are ready to wash, lanolize and use your sleep sack on your sweet baby!

notes :: if you would like to modify this pattern to make a smaller or bigger sleep sack, no problem! first of all your cast on number should always be an even number for the 2 x 2 ribbing. then, you need to divide that number by 4 and make sure that again, you get an even number- this will be the number of drawstring eyelets you will end up with. if you have an odd number of eyelets you will not be able to thread your drawstring properly.
to knit the faux cable pattern your number of stitches has to be divisible by 5. you can simply make increases after your ribbing to make sure you have the proper amount of stitches, then you will need to decrease the same number of stitches before knitting the bottom ribbing. here is a quick example for a smaller sleep sack ::
co 72 sts (72 divided by 4 is 18)
after the top ribbing increase 3 sts evenly spaced around the sleep sack.
now you will have 75 sts and are ready for the faux cable pattern.
after the faux cables, decrease 3 sts evenly around the sleep sack.
now you have 72 sts on your needles and are ready for the bottom ribbing.

Monday, December 07, 2009

fiber lover's ornament :: a little tutorial

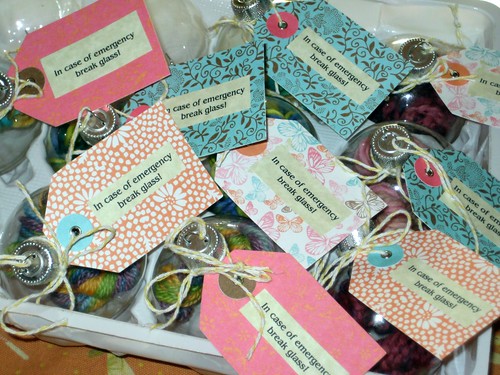
i recently made a bunch of these adorable little ornaments for some of my knitting friends. they are so cute and so easy to make! i used scrap wool left over from miscellaneous knitting projects, baker's twine for the tags and plain glass balls purchased at craft warehouse- a box of 12 was $5. the tags came from target several months ago and i simply glued the little "in case of emergency" sentiment to each one.

here is what you do ::
wind your yarn into a tiny skein (here is a tutorial on how to make a yarn skein) i used the back of a kitchen chair that is approximately 18 inches wide and wrapped the yarn 10 times.

then carefully push the tiny skein into the glass ball using a chopstick or knitting needle. i strongly caution you against using your finger to push the yarn into the ornament. there is often a little sharp piece of glass inside the neck of the ball. go ahead, ask me how i know this!!

next, pop the top onto the glass ball, add a cute little homemade tag, and that's it! your yarn-y ornament is ready to gift or deck the halls! enjoy!

Friday, March 20, 2009

felted nest :: a pattern

celebrate Spring by creating a whimsical felted nest and eggs!


materials

:: 200 yards of worsted weight, brown wool. i used lamb's pride for my nests and knit them double stranded.
:: 3 ounces of undyed wool roving
:: 1 ounce of blue wool roving
:: us size 10.5- 16 inch circular needle
:: us size 10.5 dpn
:: stitch marker
:: tapestry needle
:: old stockings for felting the eggs
:: fabric scraps (optional)

pattern

using your 10.5 circular needle, double strand your yarn and cast on 75 stitches. place marker and join in the round. knit in stockinette stitch until piece measures 5 1/2 inches from cast on edge.

decrease as follows switching to the dpns when necessary ::

round 1: *ssk, k11, k2tog. repeat from * to end- 65 sts
round 2: knit
round 3: *ssk, k9, k2tog. repeat from * to end- 55 sts
round 4: knit
round 5: *ssk, k7, k2tog. repeat from * to end- 45 sts
round 6: knit
round 7: * ssk, k5, k2tog. repeat from * to end- 35 sts
round 8: knit
round 9: *ssk, k3, k2tog. repeat from * to end- 25 sts
round 10: knit
round 11: *ssk, k1, k2tog. repeat from * to end- 15 sts
round 12: *ssk, k2tog. repeat from * to last 3 sts, ssk, k1- 8 sts remain. cut yarn and thread your yarn tail through remaining stitches and pull to close the hole. weave in yarn tails. here is what your nest will look like, pre felting. kind of like a big, floppy hat.


now, thread pieces of your yarn, various lengths, onto your tapestry needle and weave them randomly through your nest leaving a couple inches of tail sticking out. when felted they will look like little twigs. you can also use strips of fabric or brightly colored yarn, or anything a bird would use when making a nest!

time to make the eggs. using the undyed roving in 1 inch strips, start winding them into a ball. keep winding around and around until your egg is 25% larger than you want the felted egg to be. then cover the egg with a thin layer of the blue roving.

you will place the eggs into the leg of a stocking and tie a knot in between each one. these are baby tights that i cut the legs off of.

to felt the nest and eggs, place the nest into a pillow case and tie the top shut with a piece of yarn (do not use wool as it will felt together and make it hard for you to untie) throw the eggs and nest into the washer and add a little soap. wash them in hot water on the longest setting. check your nest every 6 or 7 minutes to see how it is felting. some yarn felts very quickly, and some may have to go through a couple cycles before it is felted enough.


after felting pull and stretch your nest while it is still wet until it is shaped the way you like. i rolled the the top down to make it more shallow and nest-like. you may have to squeeze the eggs a little to make them egg shaped. let them dry and that is it- you are done! if you would like a little birdy for your nest there is a free knitting pattern here and a free sewing pattern here. or how about an origami crane? if you create a nest and eggs from this pattern i would love to see! please make as many nests as you want for you and your friends, but do not sell items created from this pattern- thanks a bunch!

HaPpY Spring! enjoy!

Saturday, September 20, 2008

autumn acorn :: a pattern

this week, while creating autumn inspired crafts for our home and a swap, i looked high and low for a knit acorn pattern i had bookmarked last fall (or was it the year before??) after my search came up empty i decided to just wing it, with plenty of input from my 5 year old, and see what we could come up with.
it is with joy that i introduce you to our adorable autumn acorn!

supplies needed:
~ small amounts of yarn (approx. 1/2 oz each) in 2 colors, 1 for the body and 1 for the cap~ this is a great way to use up scraps.
~ set of 4 DPNs appropriate for your yarn. gauge is not important for this project. i used peace fleece and size 8 DPNs for the little acorn in the photos.
~ stuffing (wool roving, yarn scraps, or polyfill)
~ tapestry needle
abbreviations:
CO- cast on
K- knit
P- purl
KFB- knit into the front and back of stitch
K2tog- knit 2 sts together
bottom of acorn
*CO 6 sts and divide between 3 needles.
*row 1: k all sts
* row 2: KFB of each st (12 sts)
* row 3: k all sts
* row 4: KFB of each st (24 sts)
* row 5: k all sts
*row 6- 18: k all sts
* row 19: *K2tog, k2* all around (18 sts)
* row 20: k all sts
*row 21: *K2tog, k1* all around (12 sts)
* row 22: k all sts
* row 23: *K2tog* all around (6 sts)
now, stuff your acorn then thread your yarn tail through the 6 sts on your needles and sew shut. weave in the ends and you are ready to knit your acorn cap!
acorn cap
* CO 24 sts and divide between 3 needles. leave an extra long yarn tail when you cast on to sew your acorn cap to your acorn body later.
* row 1: k all sts
* row 2: p all sts
* row 3: k all sts
* row 4: *KFB, K3* all around (30 sts)
* row 5: k all sts
* row 6: *KFB, K4* all around (36 sts)
* row 7- 9: k all sts
* row 10: *K2tog, K4 all around (30 sts)
* row 11: k all sts
* row 12: *K2tog, K3* all around (24 sts)
* row 13: k all sts
* row 14: *K2tog, K2* all around (18 sts)
* row 15: k all sts
* row 16: *K2tog, K1* all around (12 sts)
* row 17: k all sts
* row 18: K2tog all around (6 sts)
thread your yarn tail through the 6 sts on your needles and sew shut. you can also add a little loop at the top of the cap~ good for letting little acorns hang out all over the house!
place your cap where you would like it to sit on the acorn body and stitch it on using the yarn tail from your cast on. finally, you can add a little face to your acorn. i stitched faces on ours using sock yarn and a tapestry needle but you can use beads, fabric paint, buttons... or skip the face all together!

enjoy! i would love to see all the little acorns that come to life using this pattern!

happy crafting!

Tuesday, March 25, 2008

little leg warmers


these adorable little leg warmers are great for Spring! wear them with skirts or over pants. any worsted weight yarn will work for this pattern~ i recommend using something that will wash well. the pair in the photo were knit with alternating stripes of alpine cotton and lion brand organic cotton (i was stash burning!)


material needed:

3.5 ounces/ 100 grams worsted weight yarn
size 7 double pointed needles~ set of 4
elastic thread (any color as it will not be seen)
2 pretty little buttons
tapestry needle

children's sizes 2 (4) (6) (8)

measure your child's leg from just below the knee to just below the ankle bone. this will be the length of your finished leg warmer.

cast on 30 (32) (34) (36) stitches and divide evenly between 3 needles. join and begin knitting in round in 1 x 1 rib pattern until you reach your child's leg measurement. knit the next 3 rows holding the elastic thread with your yarn, continuing the 1 x 1 rib pattern. continue without the elastic thread for another 1.5 inches.

bind off loosely, weave in ends and fold over the last 1.5 inches you knit and sew on buttons.

drawstring version:

work as directed above until you reach your child's leg measurement then bind off loosely. make a single crochet drawstring as long as you would like and thread through your leg warmer approx. 1.5 inches from the top. this is cute tied in the front or on the side!